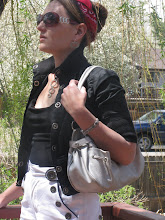
Yes. I know. I need to hem this dress. But in my (and the dress') defense, I usually wear heels with it. With flat combat boots, I didn't realize I'd have to lift it evening gown style to move.
Also, this has to be a personal record for me. I've had straight hair for three days. Yes, folks, I didn't wash the perfection that my stylist put in my hair out. It was just too darn purty.
Some of you may be asking yourself how I could bear long sleeves, a long dress and a leather vest on an August day.
We've been unseasonably blessed with cooler weather (well except for yesterday) and I am loving the break in all the heat. So I am taking advantage of it.
As promised, today I am going to show off some of my wedding shtuff. Anyone who knows me IRL knows that I can't keep a secret for shit. So I cannot wait another day to show you what I've been working on for the last ten months.
Speaking of ten months ago, Patrick got sent to San Jose today for work. He sent me a text as his plane was taking off. It said, "The last time I made this trip, I got engaged. I love you beautiful." Yeah, I'm pretty excited to marry this man. ;-)
Don't forget to send me your photo for the link-up party and don't forget to enter the Shabby Apple giveaway that I'm hosting!
Striped Maxi Dress-thrifted; Oversize White Button Down-Wal-Mart; Leather Vest-Miley Cyrus; Combat Boots-L.E.I.; Earrings-DIY and gifted
Don't Forget!!!
About the email I got from Stella with Kohl's. They want me to extend to you a 10% off discount to their online store by using the discount code BLOGIT10 upon checkout until August 23, 2012. How cool is that?
Annnnnnnd one of my absolute favorite sponsors, eShakti (remember this dress and this dress?) is AGAIN offering 10% off to you lucky Frannie Pantz readers as well by using the discount code FR24SXN
through August 31, 2012. This can even be used in addition to the 40%
off sale they are already offering on some items!
So go buy sumpin purty.
So, this is what my hair will look like from the front. I was so psyched. I chose to follow suit of this pin and showed it to the salon that is doing my hair, The Spot Salon. Vanessa rocked the hizzy.
From the left side.
From the right side.
From the back. It's obviously just a trial run, but I think it turned out well. Plus, I loved Vanessa so much that I scheduled a hair coloring for next Saturday while I was at it.
So all of these photos were taken with my IPad. Please excuse the fuzzy appearance. Patrick actually made this. It is a cupcake stand. I added the ribbons on the edges. He bought a bunch of wood pieces from Lowe's and took a blowtorch to them to give them a rustic feel.
These are the water bottles that I blistered my thumbs over. All 300 of them. We just bought a bunch of water bottles and some colored duct tape in our wedding colors and I applied them. I got the idea from this pin.
These. Fans. These mother trucking fans. Took me for-ev-er (I hope you said that in the Sandlot voice in your head). I got the idea from this pin. It seemed so simple. But of course, it looked a lot easier than it was. I started with lots of boards of foam board. Then, I cut out a cardboard mock-up and traced it onto the dozens of foam boards. After cutting them all out with an Exacto knife, I then used a Sharpie to draw on the opening of the mason jar and the creases for the lid. Patrick helped me insert the popsicle sticks (it is much harder than it looks. Trust.). Then, I cut out a bunch of rectangles from various cardstock for the "labels". From there, I used the three stamps for the decoration. Then, I used the 458 kinds of leftover ribbon I had in our wedding colors and tied them to the popsicle sticks. I secured the bows with hot glue. I haven't done the backs yet (still waiting on that officiant . . .), but they will contain the program of the wedding.
I loved this pin of a fingerprint guest book so much, that I decided to make one myself. I drew the tree, silhouettes and writing on a canvas and colored them in with colored pencils. Then I got ink to match our wedding colors for the fingerprints, Sharpies to sign their names on the fingerprints and baby wipes to wipe off the ink (can you believe that I found a baby wipe container with purple and orange squares on it??? Neither could I). I also made instructions that say "the wedding tree, please "leaf" your fingerprint and sign your name". I bought a wooden frame for the canvas and viola. We have a guest book.
40 of our 150 guests are children. I know, right? But we love kids in both of our families (obvi.). What we don't love, though, are cranky, bored kids. So when I saw this pin, I told myself that I had to recreate the activity books. I used the printout and printed them on purple and orange paper. Then, I got a bunch of little boxes of crayons.
Even though we already have a guest book, I saw this pin and thought that this would be a cool thing to have at the wedding (though the pin states that it is for a bridal shower, but I didn't have a bridal shower, so I felt justified in using it at the wedding). The guests will write date night ideas on these sticks and put them in a mason jar that I decorated.
I went cuh-razy with my wood burning tool during this extravaganza. For real. So I made all of these signs.
This was inspired by this pin
And this one is from this pin
These will hang on the back of our chairs at the reception.
A simple thank you for our family and friends and a reminder to make good choices if you chose to drink at the reception.
I made these buckets for my three flower girls. I bought the plain wooden buckets from Michaels and intertwined the ribbons in them.
This is the ring bearer box that I made for Conner to use. It was a plain box from Michael's with frames for pictures on the top. I used paint, the wood burner tool, ribbon and burlap to decorate the top, sides and bottom. I engraved the wedding date into the front of the box.
Then I put pictures of Patrick and I when we were younger in the frames on the top.
This is what the back looks like.
Unfortunately, there are a lot of people that I want to be at the wedding that have passed away (namely my Grandmothers and Bob, plus my Grandpa on my dad's side and my great grandmothers). So I knew right away that I wanted to honor them in some way. After searching for a tree to hang their pictures on for weeks, I came upon this wreath made out of branches and attached the pictures of those who can't be with us to it. I made a sign that says "in loving memory of those who are forever present in our hearts" and put it in a lovely frame. I found this lantern at Micheal's and also a candle that works off of batteries to put inside of it. That way it will safely flicker next to the display.
Back when I first got engaged and knew I was doing a vintage-y, rustic-y wedding, I started just picking up random pieces from flea markets. This birdcage was one of them. I added a faux LV scarf inside of it and put all the little bubbles (also for the kids) inside of it.
I found this awesome vintage jewelery box and old postcards of the Golden Gate bridge (where I got engaged) and forgot about them until recently. I am going to put these out on display as well.
I didn't make these, but they were one of the first wedding purchases I made. I fell in love with these cake toppers as soon as I saw them. And you know what? I still love them. I bought them off of Etsy.
I got this Saks Fifth Avenue hat box from a flea market and planned on using it for cards at the wedding. Unfortunately, Nakita chewed the ever living out of it. Fortunately, my sister found this purple floral one and the vintage pillbox hat and vail. I decided to put them all together for a stacked effect for the cards, since I fixed the one Nakita destroyed and loved them both!
Finally, these are the centerpieces. I spent months making dozens and dozens of these mason jars. I put burlap and ribbons on them. Then, I filled them with sand and put little LED tealight candles in them. My mom and stepdad-to-be cute a bunch of log slices, which I am putting under the mason jars. I also printed out a bunch of really cute wedding-y romantic quotes via Pintrest (duh) and put them in various wooden frames.
So that's where we're at so far. Sorry to be so picture heavy today, but I've gotten a lot of requests re my wedding crafting. And honestly I'm really proud of what I've accomplished. I started DIY projects at my engagement and didn't consider myself a crafty person. Maybe I do have some of my Grandmothers' crafting genes in me after all . . .
So that's where we're at so far. Sorry to be so picture heavy today, but I've gotten a lot of requests re my wedding crafting. And honestly I'm really proud of what I've accomplished. I started DIY projects at my engagement and didn't consider myself a crafty person. Maybe I do have some of my Grandmothers' crafting genes in me after all . . .


I love all of your wedding crafts!! And your hair is gorgeous, I love the headpiece :)
ReplyDelete